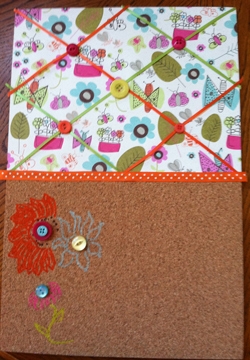
Not only is this memo board cute, it is sturdy!
It made it home from a trade show without visible wear and tear or structural damage (and it was tucked into a vehicle that was packed full of stuff!) Kudos to the folks at Elmer’s for pairing a thin layer of cork on top of foam-core board. The super simple instructions for this memo board are below, but I can see this as useful as elementary school science project explanation boards.
What might you use Cork Foam Board to make?
Materials:
Elmer’s 20” x30” x 3/8” Cork Foam Board
Board Mate Dual Tip Glue Pen
CraftBond Quick Dry Dual Tip Pens
Glue Spots, thin-small
X-Acto Curve Knife with Z Series #11 Blade
Metal Ruler
12” x 12” Self Healing Cutting Mat
Scissors
Scrapbook Paper
Painters brand Opaque Paint Markers in coordinating colors
Ribbon:
30” lengths of 1/8” wide each of two coordinating colors
12” length of 3/8” wide patterned ribbon
8 flathead thumbtacks
8 1/2” to 3/8” buttons
Instructions:
Measure four equal portions of the Cork Foam Board. Score board lightly with your X-Acto Knife (place it against the metal ruler for cutting ease) then cut deeper with several passes of the knife. You now have four pieces that are 10” x 15”.
Place the board vertically on your work surface. Mark and measure 7 1/2” down from each corner and draw a line horizontally connecting the marks.
Generously apply glue to the top half of the board and cover with scrapbook paper. Flip foam board over and use X-Acto knife to trim edges.
Flip the board back over and mark the middle along each edge of the paper side of the board.
Glue ribbon at corners only crossing board as shown it the photo. Trim excess length with scissors.
Apply a line of glue across bottom edge of paper and adhere patterned ribbon. Trim excess.
Use glue spots to attach buttons to ribbon intersections and tops of thumbtacks.
Use paint markers to decorate cork as you wish and then let dry.
Attach your chosen hanger to the back or place in a wooden frame.
Hmmmm… I can see vintage looking scrapbook paper paired with repurposed jewelry instead of buttons or,
wait!
sports themed scrapbook paper and matching sports buttons…
However you make this project, I wish for you to have fun!

